Faux Brick Tutorial


Creating faux brick looks complicated, but it’s a project of instinct, and is best accomplished by learning to love real brick, studying its textures and colors, then creating a good, straight base of brick – which you will then “age,” by making yourself believe it’s really brick!
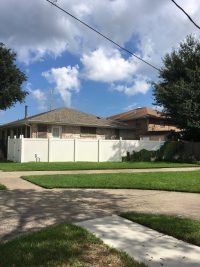
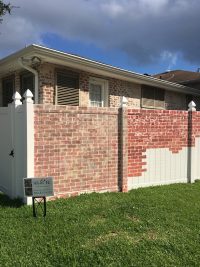
The project above evolved like this: My client, Devvie, is a French Quarter artist who has moved to (gulp!) the suburbs of Metairie. She’s enjoying a new kind of life, but misses the historic aesthetic of her old environment, and wanted to hide the very modern (and bright) white fence which separates her yard from her neighbor’s. She was inspired by my post on our neighborhood app to create a mural between the yards; ironically, she wanted to do EXACTLY what I’ve been dying to do on our driveway fence; which is to make it disappear with a fool-the-eye mural. She started painting in some plants at the far right end – then had an awful auto accident, which left her in the hospital for two months.
Devvie is slowly recovering, but couldn’t finish her mural herself. It’s a lot of physical standing, bending and reaching; so she called me to help her continue with her vision… and we are making great progress. Eventually, the entire wall will look like the first fence section on the left. Over the brick, I will add a low wrought iron fence and some lush tropical plants. In other words, it will look like you can see through the iron fence to the yard next door. A fun illusion I can’t wait to complete.
Meanwhile, I’ve been getting lots of “How do you do that?” questions, so I thought I’d share the process.
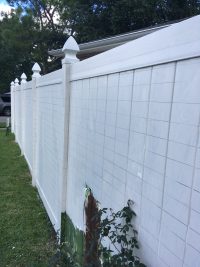
On this one, the base coat was more important than usual. This plastic fence is an unknown surface to me. I was afraid the paint would easily scratch off, or even wash off in the rain. We are using chalk paint, which is really for crafts and furniture, so… I asked the paint department at Lowe’s, and they suggested Zinsser Bulls-Eye 1-2-3 primer. It’s supposed to coat any surface, and make any kind of paint stick to it. Get the primer tinted in the color you want to use for your “mortar.” This will save you a ton of time. You paint your base coat, and I hate to say it, but doing a sloppy job of this is the best thing you can do. If your paint has chunky uneven spots, all the better. This helps create texture, which will dismay you in this step and amaze you as the project moves on.
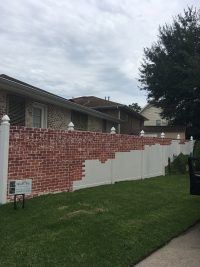
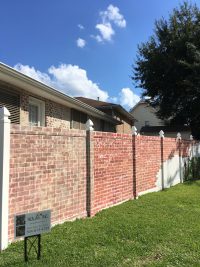
Next, the brick “foundation” is very important. You can see that this fence runs uphill. The house behind it does not. So, to match the brick to the house, it’s not going to run neatly along the lines of the fence.
Thank goodness for Bobby! He designed a 2 x 4 with a tiny level inserted into the wood. Bricks are 8″ long and 3.5 inches wide, approximately. By using the 2 x 4, the width is wide enough to be the space for one brick, plus a bit of mortar. I started at the top, drawing horizontal lines which run level to the ground. I drew the lines across and down the entire project.
It’s not really important to measure the widths or to be too precise on anything else but this step.
Next, think about the brick you want to create and pick your colors. Think about real brick. It’s rarely one neat, uniform color, and each brick will vary slightly in color from the others. Some brick masons mix different colored bricks and lay them in varied patterns… so what did “your” brick look like when it was brand new? The first layer is going to be “new” brick. Then you’re going to make it old – but later.
In a flat pan (I like to use crawfish trays, because I can stand with them and carry them in my hand while I paint, but use whatever). Choose three basic colors for your “new” bricks. I like to use a lot of terra cotta, barn red and brown. I spill these into puddles on the tray. Then, using a 2″ foam roller (for crafts), roll the roller through all three colors. Really run it through there. Get “too much” on there, roll it and smush it until the roller is soaked, You don’t want the distinct different colors to be “patchy,” but you do want some variation in color on each brick, so… don’t blend them smoothly together, but mix them on the roller.
Begin to roll the top of each brick along your guide lines. If you want, you can make 8″ spaces to know where to stop, but I never do. If the lengths get “wonky,” you can correct it with the mortar later. Go along the entire length of your project, and remember to flip and change the position of your roller and get more paint frequently, so the bricks are not all the same. On each brick, do the top line, then flip your roller and do the bottom half of the brick. Leave about a 1/4 inch space above the next line. This is your mortar.
On the next line of bricks, you will do the same process, but you’ll be off-setting each brick halfway beneath the one above it _-_ like that.
*** Don’t get crazy – but don’t worry if you make a few mistakes. As long as the bricks are in the right positions, it is not going to matter if they look good or not at this point. I like to do a “thick” coat of paint on the roller – almost dripping. I very lightly roll the brick on, letting the clumps of paint go onto the project. It will eventually be this “sloppy” layer that makes the bricks look best. Keep doing bricks, even as your roller dries… just push harder. You’ll be amazed how the “dry” roller really begins to create something that looks dimensional.
Do the entire base of your project in these colors. Do not switch colors until you’re done with the foundation.
After this step – get away from it. Seriously. Quit for the day, go have lunch, watch Netflix. You need to let your head clear and see it from a fresh perspective before you start again.
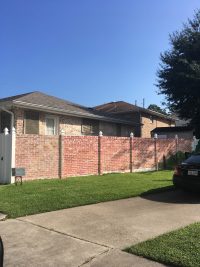
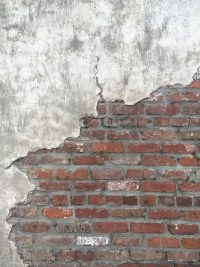
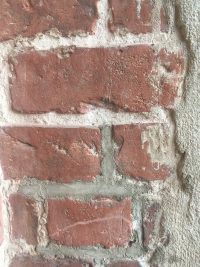
Next: Look at the brick you eventually want. If it’s old, think of the real life struggles brick undergoes. Often, it is patched in some areas with mortar – sometimes completely covering parts of the brick – or even whole bricks. It gets rained on. It loses chunks of mortar. The mortar grows a bit of mildew. Years and years of dust in the wind throw dirt into the all the little bumps in the brick.
Something like this process now has to happen with your paint. YOU are the hands of time. Look at your colors. They are probably too bright at this point, and that’s ok. I use brown, primitive, grey, etc. and start to tone down the bricks by “dry rolling” colors onto the existing bricks to tweak the color. The “eterno” color pictured above is a great color for unifying. I used it on the fence on both the bricks and the mortar. Using sea sponges to dab on “blotches” of color works well, too. Just remember to turn the sponge in different positions as you go to avoid uniformity.
I used the edge of the roller to do a MESSY outline between some of the bricks. As the roller gets drier and drier, I then begin rolling it OVER the bricks I’ve already painted. LIGHTLY use the mortar color on the corners of the bricks. A quick cheat is to roll diagonally across many bricks at once. Use a light touch, because you don’t want roller lines which will look unnatural.
In this step, it will begin to amaze you how real your bricks are beginning to look. You’ll find yourself actually thinking of them as bricks now, and this is when you can start to “pop” some detail.
I like to take a dark grey or brown and dip a bit onto a cloth with my index finger inside the cloth. I wipe this in the paint tray until it’s soaked into the cloth. Then I start to think about bringing out some of the edges that I “erased” in the step above. Test this by going to the corner of one of the bricks and using your finger and the paint to “rub” the corner, rubbing inward toward the center of the brick. When the rag is getting so dry that you feel you need more paint, just go nuts with it across bricks AND mortar, and you’ll start to see it as little dark flecks, like dirt that got caught on the wall.
At this point, you should really start feeling like the bricks and mortar are separate things. It’s starting to look and feel like real, old brick. And by now, you should have a feel for this process. Here’s where you start following your instincts and tweaking the colors, the way the bricks and mortar come together, making them older, dirtier, adding some holes, maybe? Maybe some patches of mortar that cover the bricks in one section, like a repair?
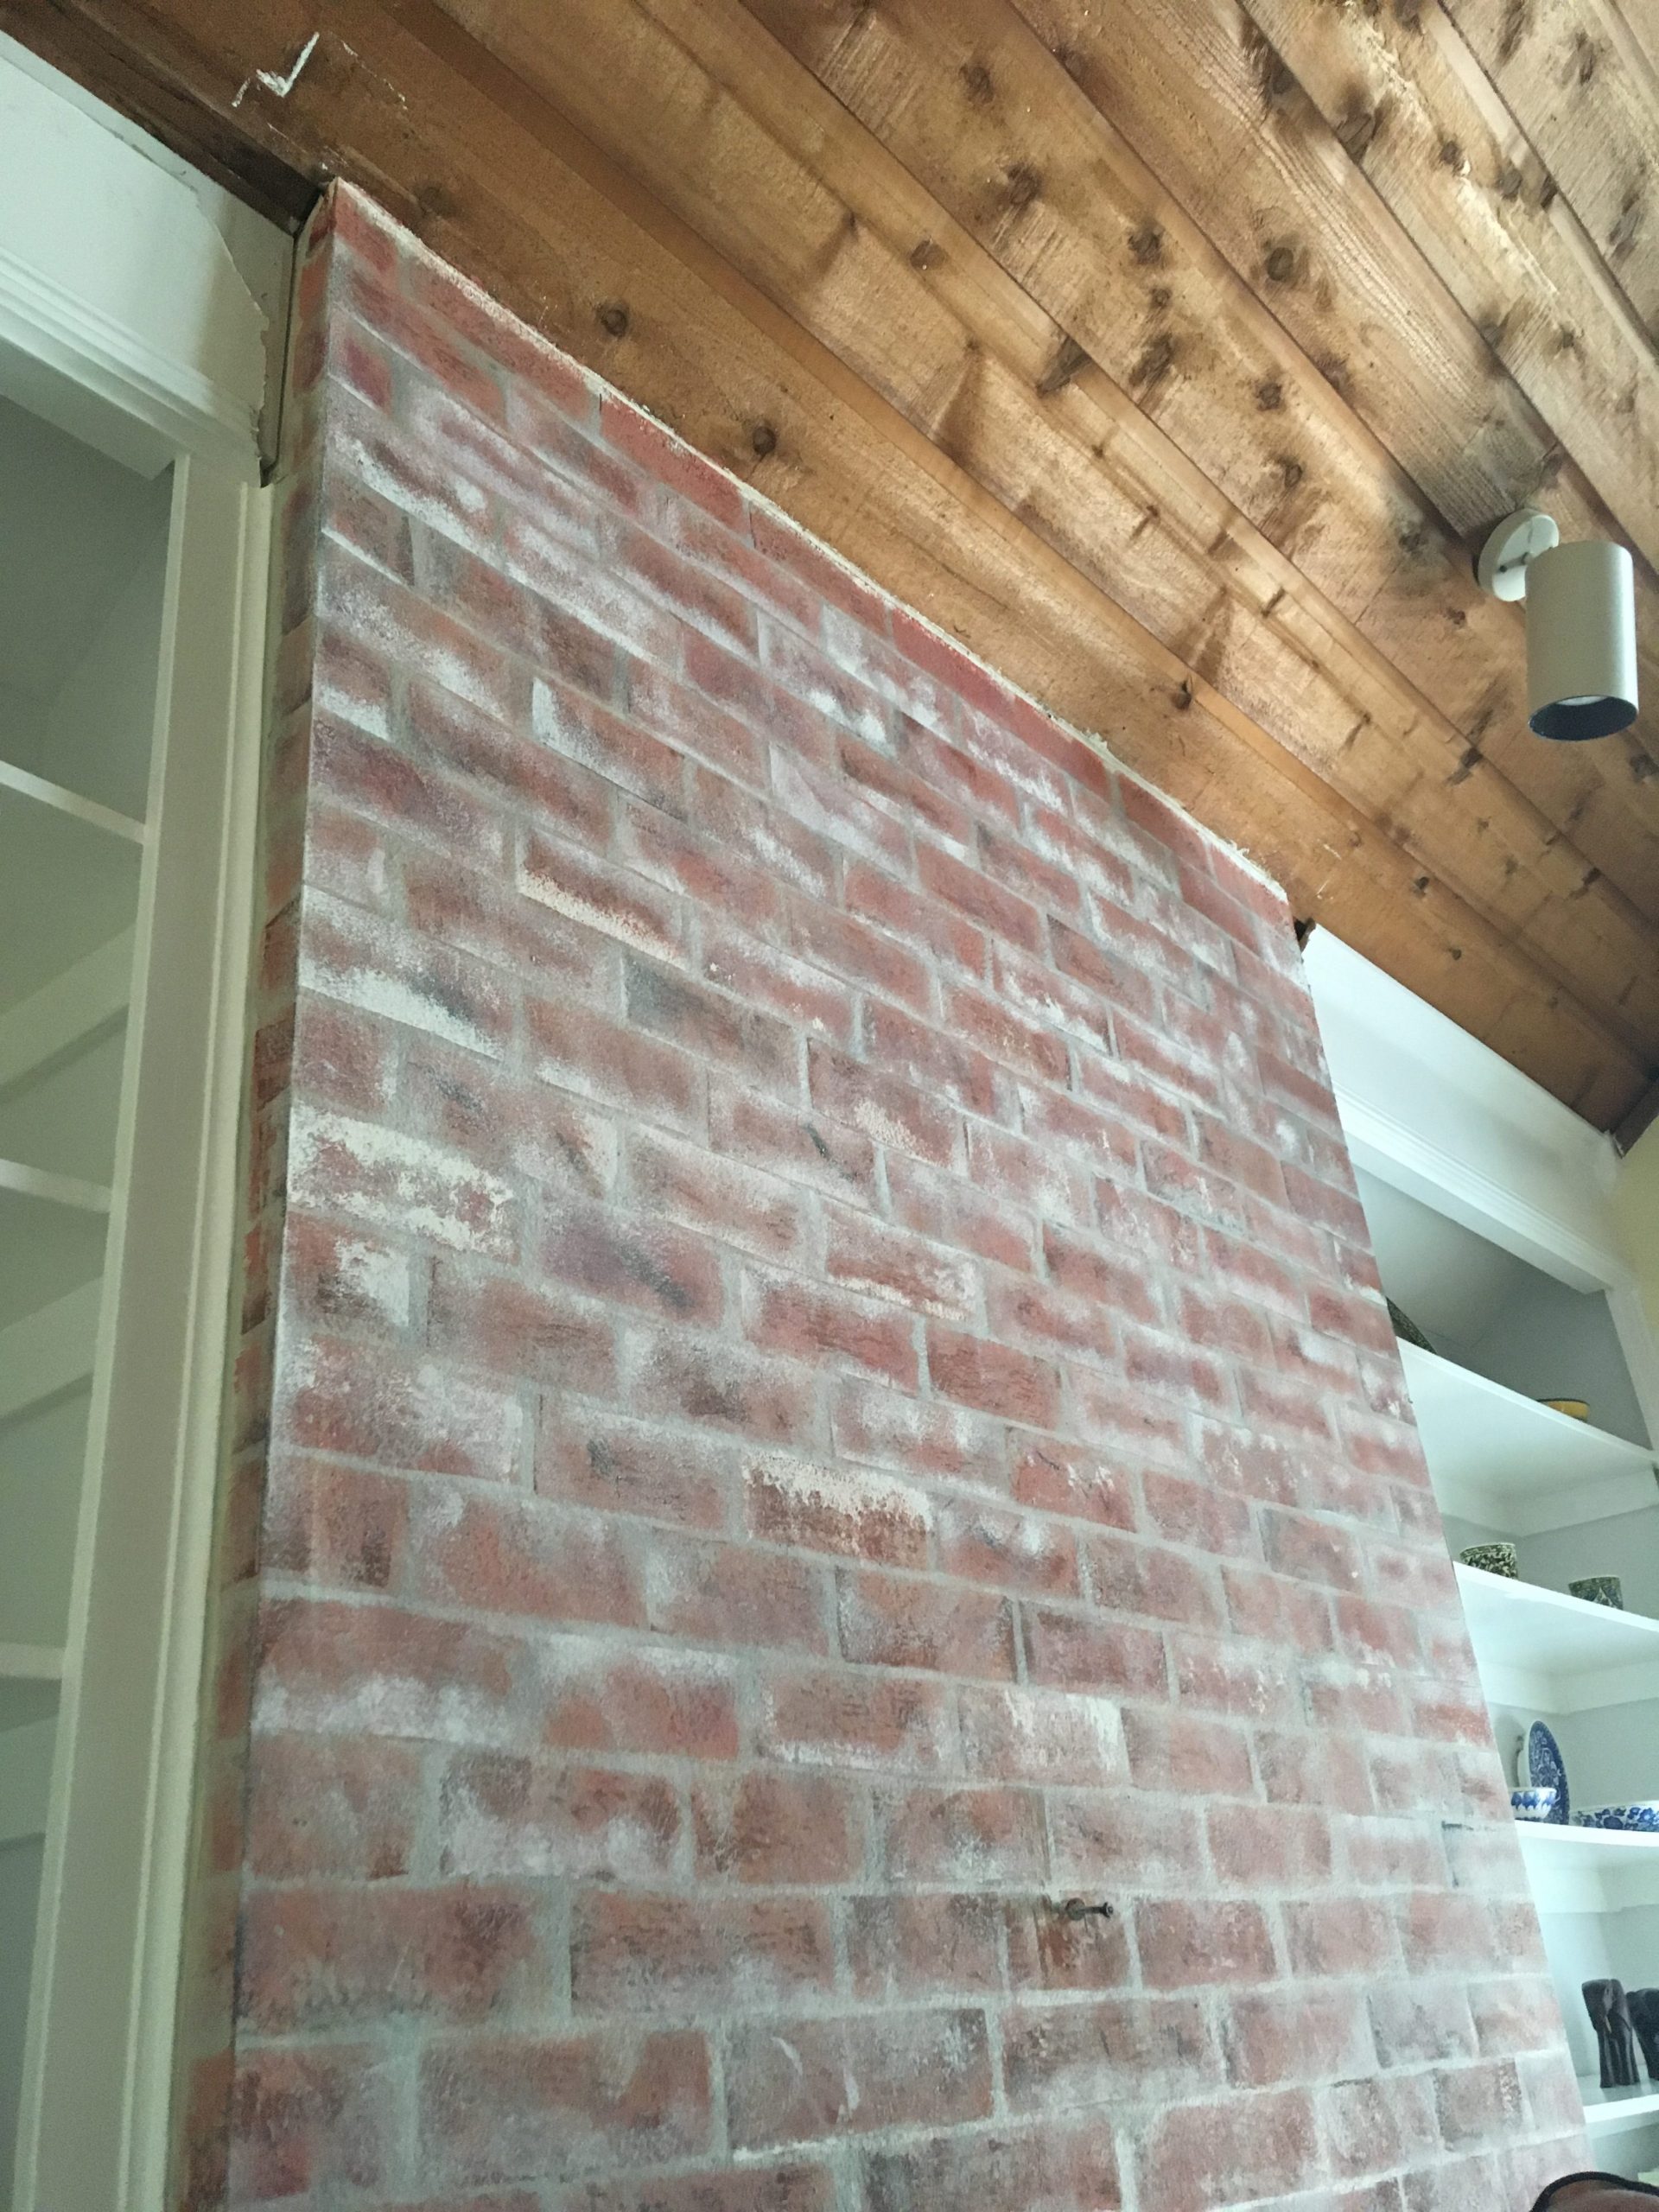
So… it’s hard to say when you’re done. On every brick project I’ve ever done, I thought I was days away from finishing, but everyone else was saying, “Oh my gosh, I had to touch it to tell if it was painted!” It’s important to take a picture each step when you finish, then get away from it, and have a fresh look – because you may be done!
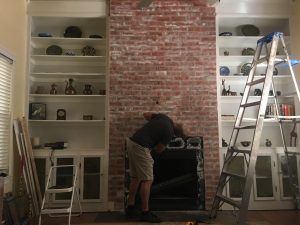
Here’s an example of one I thought still needed lots of work. Turns out, it was perfect like it was, and I’ve gotten several recommendations for other jobs because of this accent wall:


Real Estate Muses Workshop: A Personal Development Workshop for Real Estate Agents Who Follow the Muse... Anne Beck is a local real estate broker with a passion for the unique lifestyle of New Orleans. This blog is a way of sharing the endless supply of humor and irony to be found around the city on any given day. Enjoy snippets of life around town, and some great tips for travelers and those seeking to join us as citizens of New Orleans. For info on buying or selling a home in NOLA , call Anne for a FREE evaluation of your home, or a FREE neighborhood price watch list for buyers. 504-812-4702 www.nolasinc.com